
How To Use The WordPress Media Library

In this tutorial, you will learn how to use the WordPress Media Library, including:
- Overview of the WordPress Media Library
- Media file types supported in WordPress
- How to upload media to WordPress
- How to add media files to your WordPress library
- How to attach media files to posts and pages in WordPress
- How to insert media into your posts and pages
- How to edit media files in the WordPress Media Library
- How to delete media files from the WordPress Media Library
- How to view items in the WordPress Media Library
- Additional information – Using the Media Library Table
- WordPress Media plugins
For additional information related to using the WordPress Media Library, see these tutorials:
- How To Create A Post In WordPress
- How To Create Pages In WordPress
- How To Use The WordPress Classic Editor
- How To Use The WordPress Block Editor
***
Overview Of The WordPress Media Library
The WordPress Media Library is an important feature of the WordPress content management system (CMS).
Website pages combine text and media and this media needs to be stored somewhere where your posts, pages, sliders, galleries, and custom post types (e.g. product pages), can access and display them when your site loads on a user’s web browser.
You can either store media for your site’s content externally (e.g. in the cloud), or internally on your own server.
The WordPress Media Library, then, essentially acts as a directory that allows you to manage every single media file that has been uploaded to your site (whether published or not) and is stored on your server.
It provides an interface where you can organize, view, edit, and delete your media files from your site’s administration area (i.e. without leaving your site).
Typically, you will upload and add media to your content when creating or editing a post or page.
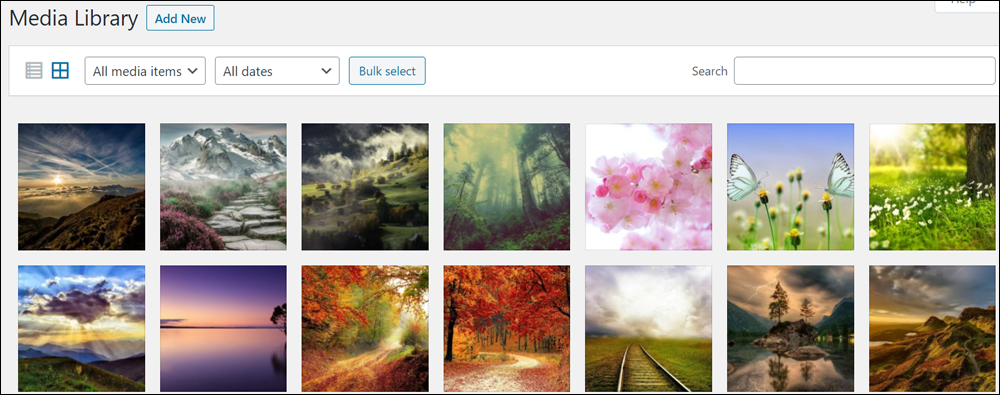
In addition to adding single media files (e.g. an image) to your content, the WordPress Media Library also allows you to easily create galleries and playlists and insert these into your posts and pages with drag and drop reordering, inline caption editing, and simplified controls for layouts, among other things.
![]()
The WordPress Media Settings section controls media settings such as specifying the size of thumbnail images and options for the location and structure of the media upload directory (where your media files are stored).
Media File Types Supported By WordPress
You can upload and store various types of media files in the WordPress Media Library, and add these to your content.
The most common file types are images, video recordings, and audio files, but you can also use other file types such as PDF documents, spreadsheets, text snippets (e.g. code samples or video transcription files), etc.
For security reasons, WordPress supports only certain types of files.
Allowed file types include:
Images
- .jpg
- .jpeg
- .png
- .gif
- .ico
Video
- .mp4, .m4v (MPEG-4)
- .mov (QuickTime)
- .wmv (Windows Media Video)
- .avi
- .mpg
- .ogv (Ogg)
- .3gp (3GPP)
- .3g2 (3GPP2)
Audio
- .mp3
- .m4a
- ogg
- .wav
Documents
- .pdf (Portable Document Format; Adobe Acrobat)
- .doc, .docx (Microsoft Word Document)
- .ppt, .pptx, .pps, .ppsx (Microsoft PowerPoint Presentation)
- .odt (OpenDocument Text Document)
- .xls, .xlsx (Microsoft Excel Document)
- .psd (Adobe Photoshop Document)
![]()
Some web hosts may not allow you to upload some of the file types listed above (and/or upload large files). Check with your host if you experience issues uploading files to your WordPress site.
How To Upload Media Files To WordPress
In WordPress, you can:
- Upload media files to your Media Library while creating a new post or page, or
- Upload media files to your site without creating a post or page first.
Uploading media files to the WordPress Library on their own allows you to have these files ready for use as you create new posts and pages on your site, and/or get web links for files that you want to share (e.g. the URL to an image stored on your server).
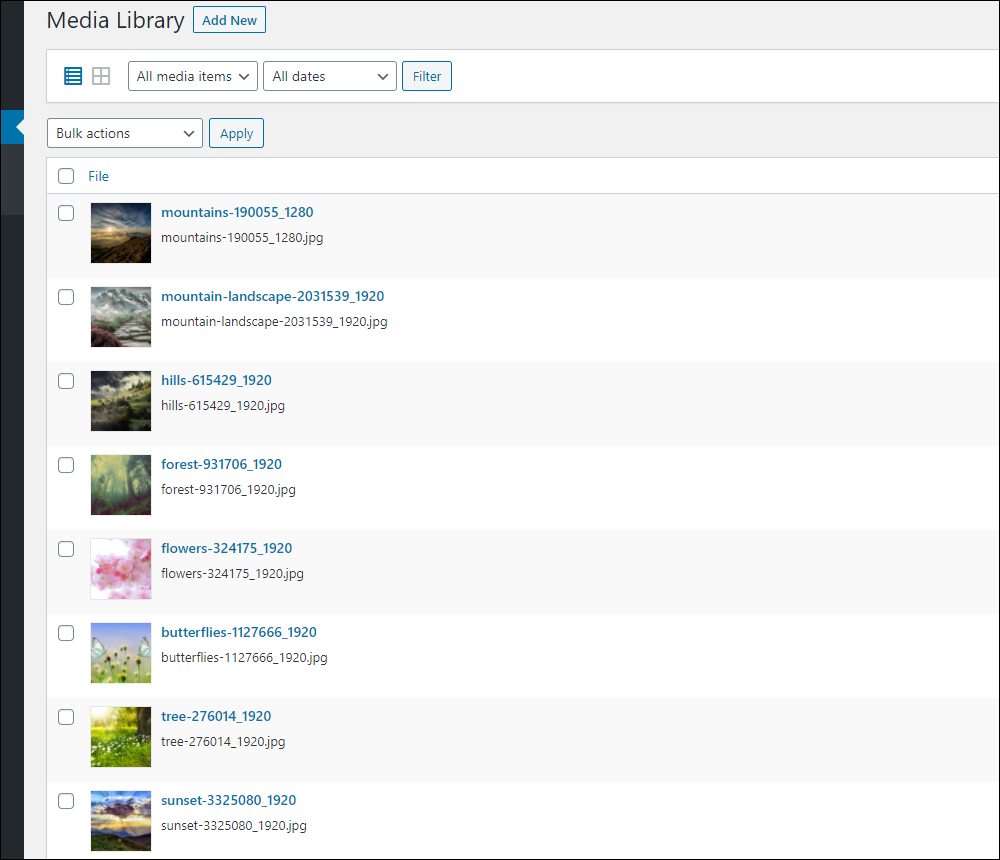
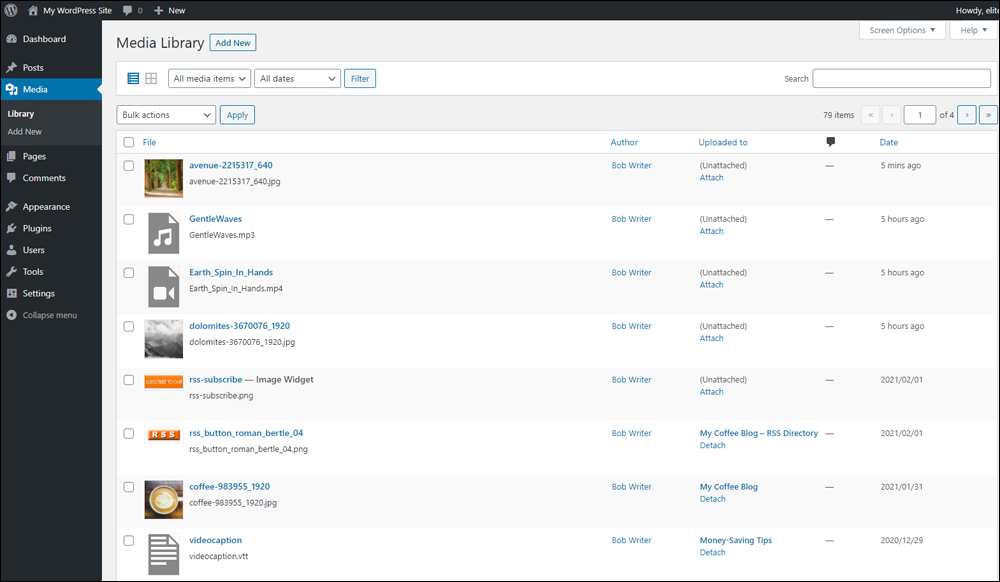
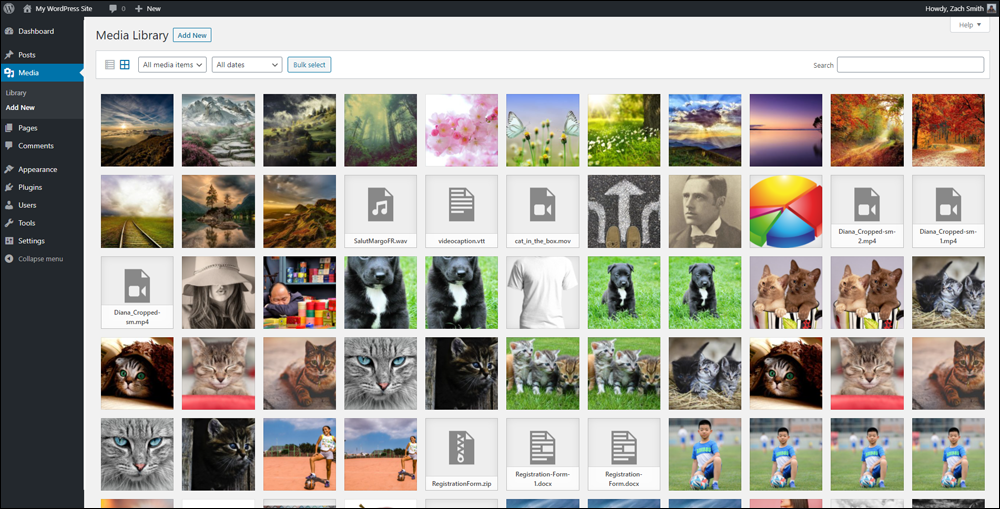
To view all the media files in your WordPress site’s Media Library, go to your navigation menu and click on Media > Library.

This brings up the Media Library screen.
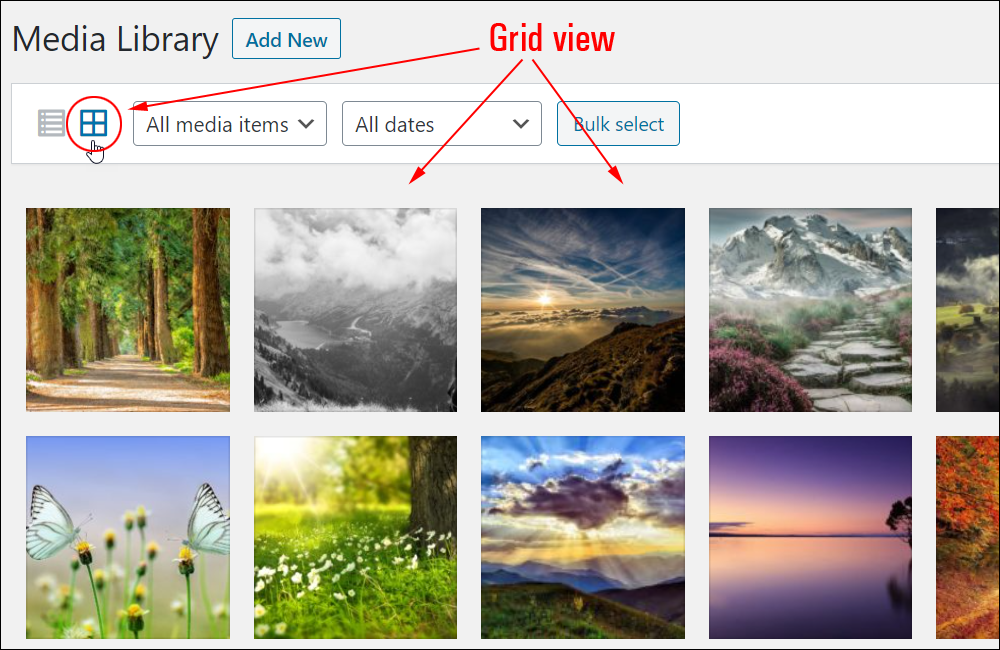
Items in the Media Library screen can be viewed in Grid view mode…
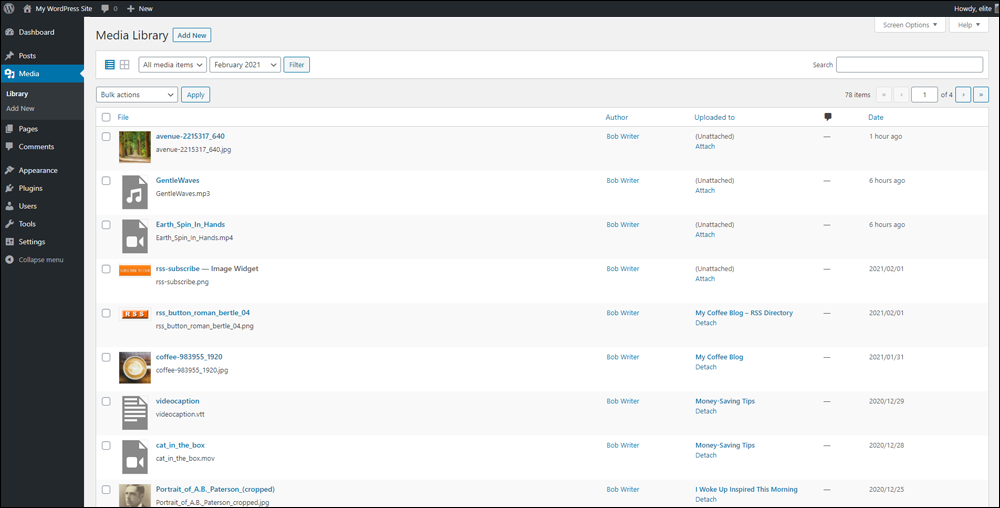
Or List view mode…
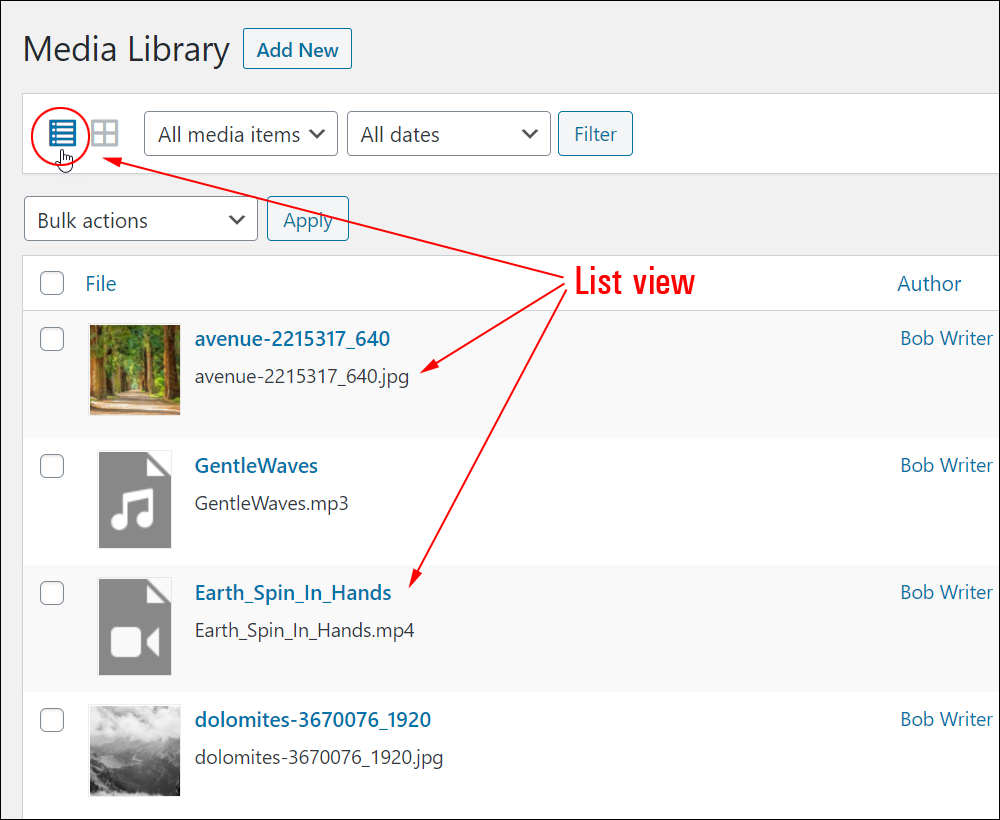
We cover the features of the Media Library screen in more detail further below.
If you have not added any media files to your Media Library or are working on a brand-new WordPress installation, the Media Library screen will be empty and display a “No media items found message”.
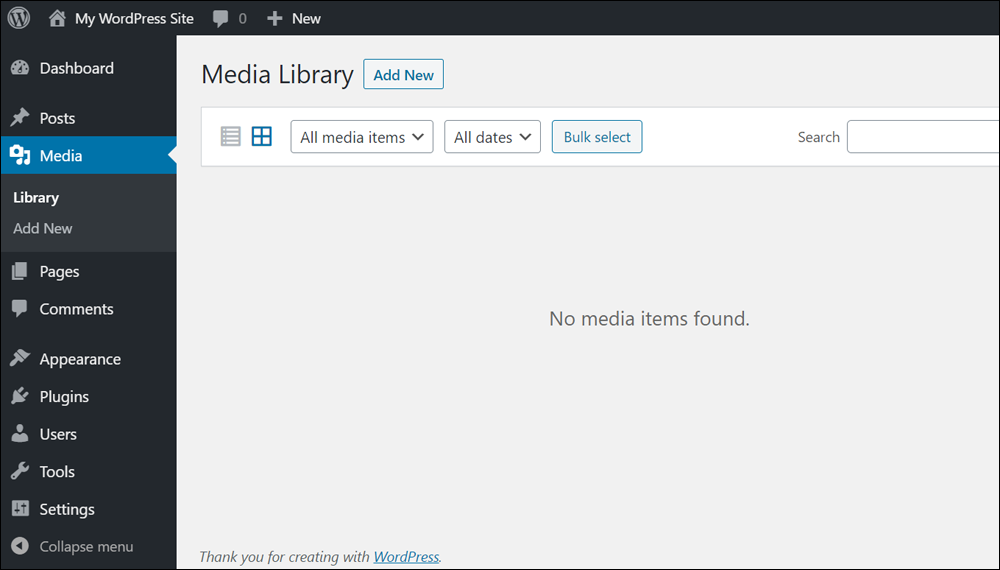
Let’s show you how to start adding media to the WordPress Medial Library.
How To Add Media Files To Your WordPress Media Library
To add media files to your WordPress site’s Media Library, go to your navigation menu and click on Media > Add New…

You can also add media files to your site by going to Media > Library and clicking on the Add New button in the Media Library screen.
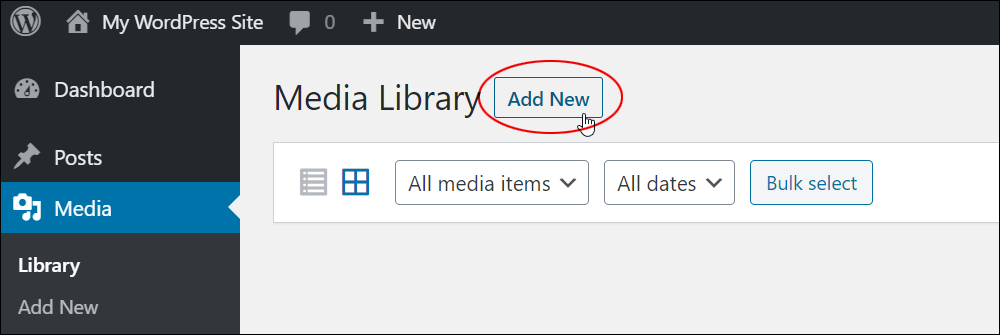
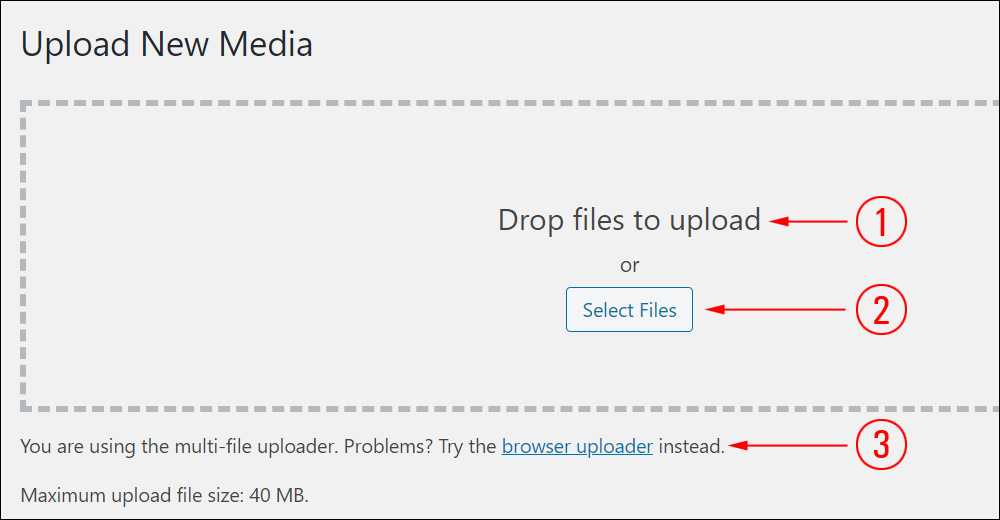
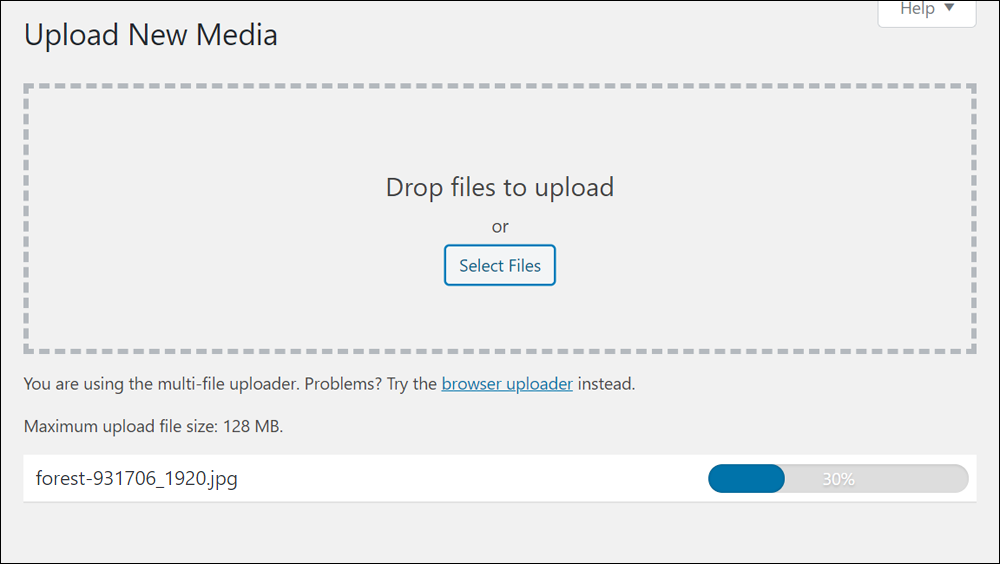
This will open a new screen called ‘Upload New Media’ with the WordPress multi-file media uploader.
This feature allows you to upload multiple media files to the WordPress Media Library.
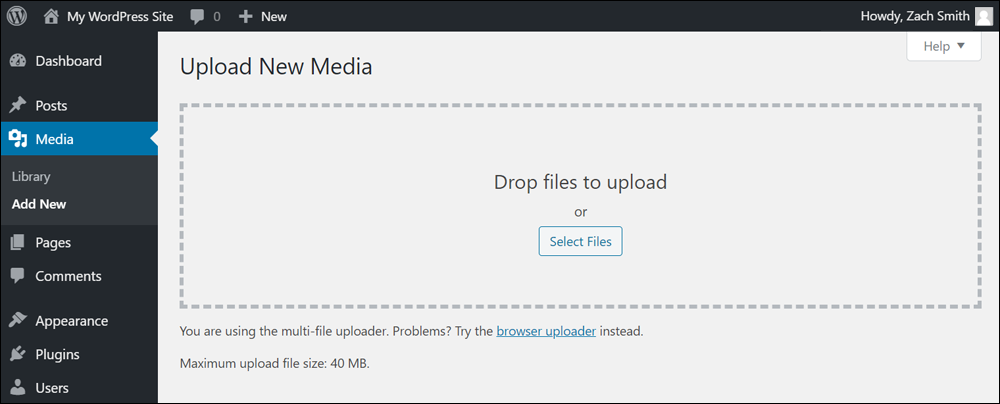
There are three options you can use to upload media files to your site via the WordPress Media Library:
- Drag-And-Drop: Add multiple files to your Media Library by selecting a group of files from a media folder on your hard drive and dragging them into the Drop files to upload area surrounded by a dashed border.
- Select Files: Clicking on this button opens a browser window that lets you select and upload files from your computer.
- You can also use the Browser Uploader if you experience any problems using the multi-file uploader.
![]()
Note: the maximum upload size for media files is determined by your web hosting account settings.
In the example screenshot above, the Maximum upload file size is 40MB (MegaBytes), which is enough for commonly used media files like images.
The ‘Upload New Media’ screen on your site may show a different maximum limit.
If you experience problems uploading media files to your WordPress site, your limit size may be set too low.
You could use an image editing application to resize the image, but it’s best to ask your web hosting company to increase your file upload settings or see this tutorial: How To Increase Maximum File Upload Size In WordPress
Let’s go through each of the above file upload methods.
Drag and Drop Files To Upload
The drag-and-drop method is useful if you want to upload multiple media files from a folder on your computer, an external hard drive, or a USB stick.
However, you can also use it to upload a single image.
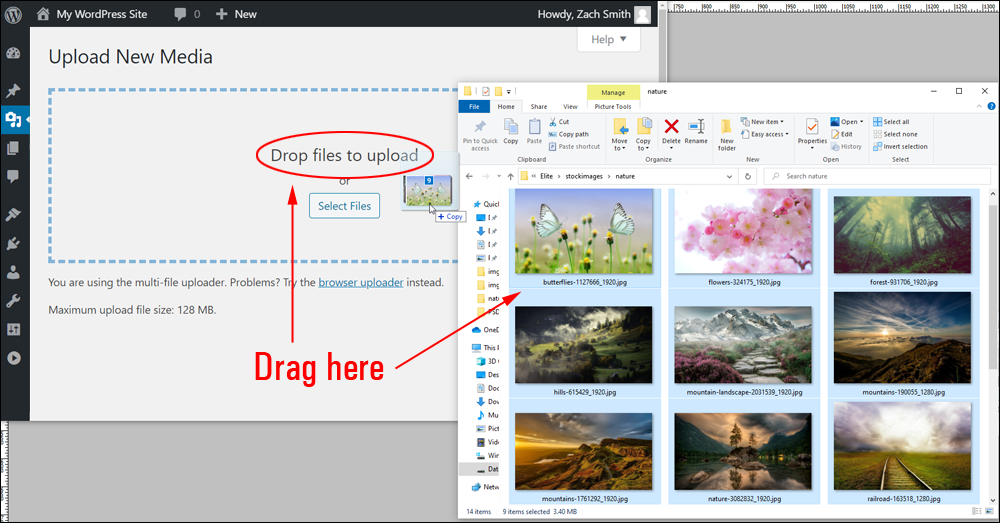
Make sure that both the Upload New Media screen and the folder containing your image files are open and visible on your screen (you may have to resize the windows on your browser to see them both).
Next click on a single image, or select multiple images by holding down the Shift or CTRL buttons (Windows users), drag the selected files from your media folder into the blue dotted area of the Upload New Media screen (in the Drop files to upload section), and release these with your mouse.
After selecting and dropping your media files to the upload area, a progress bar will display on your screen showing you which files have been uploaded or are uploading to the Media Library.
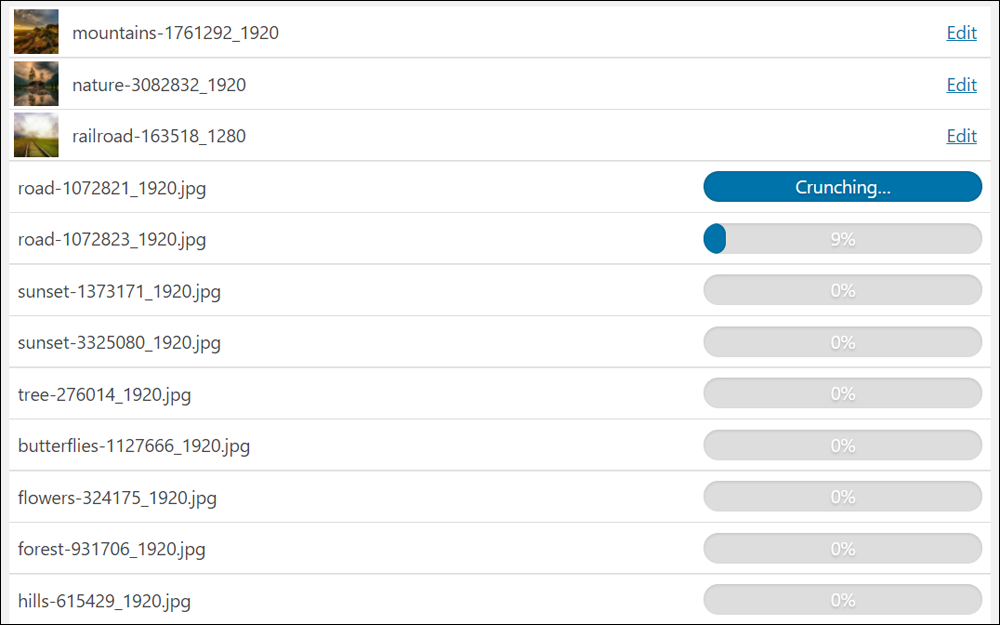
Once your media files have been uploaded, you can click on the ‘Edit’ link to edit the file (we cover this in a separate tutorial) or view these on your Media Library screen.
Another way to upload files to the Media Library is to use the ‘Select Files’ method described below.
Select Files Button
This method allows you to search for your media files (e.g. in your computer or an external hard drive), then upload one or multiple media files to the Media Library:
- Click on the Select Files button in the Media Uploader and locate the folder containing your media files, then,
- Select one or more files to upload and click Open in the File Upload window.
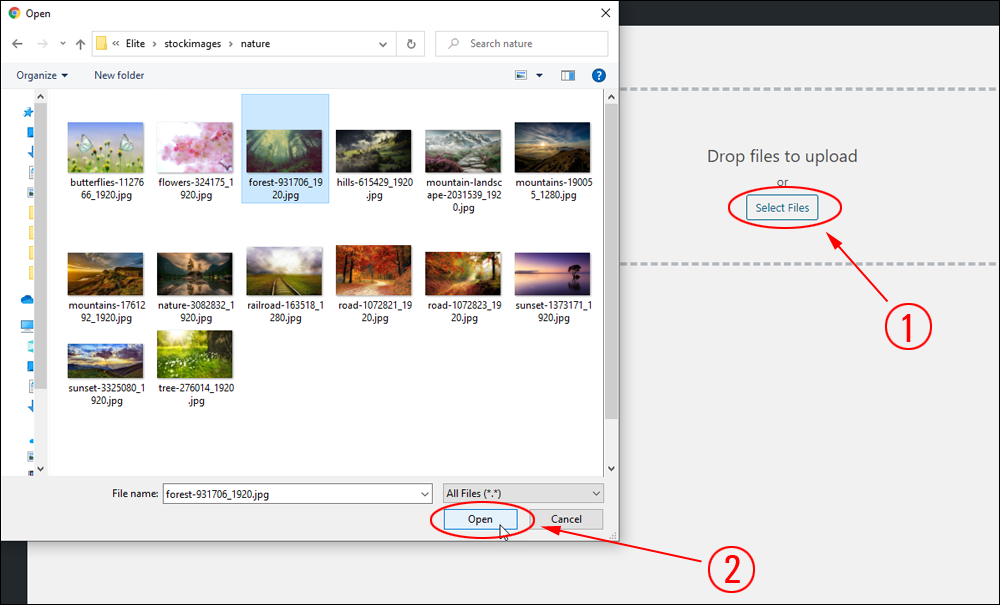
Selecting the file(s) you want to upload and clicking Open also activates a progress bar on the Upload New Media screen so you can track the progress of your upload.
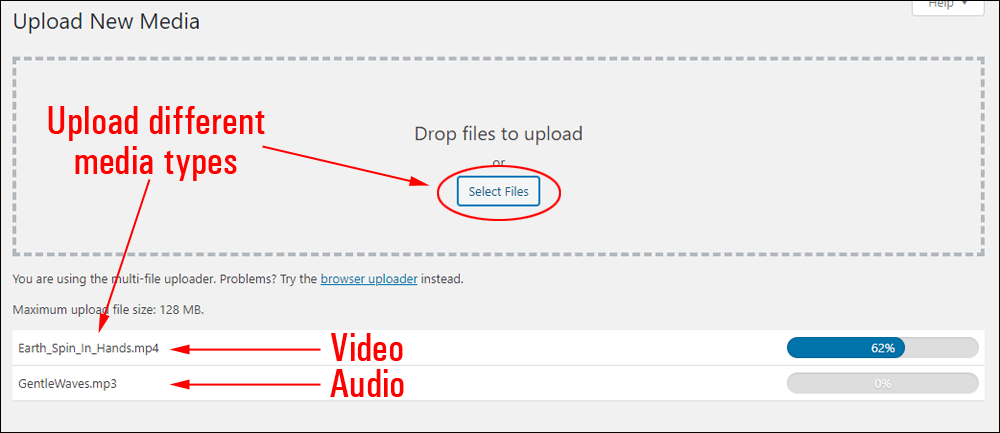
You can also use this method to upload different media file types (e.g. audio and video files) from your computer or an external hard drive.
As you add new files, the selected files are placed in a queue waiting to be uploaded.
Use The Browser Uploader
If you experience any issues uploading your files using the above methods, try using the browser uploader instead.
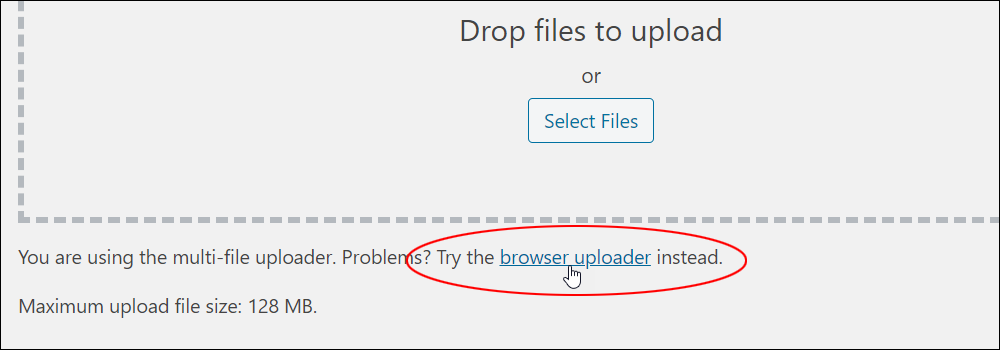
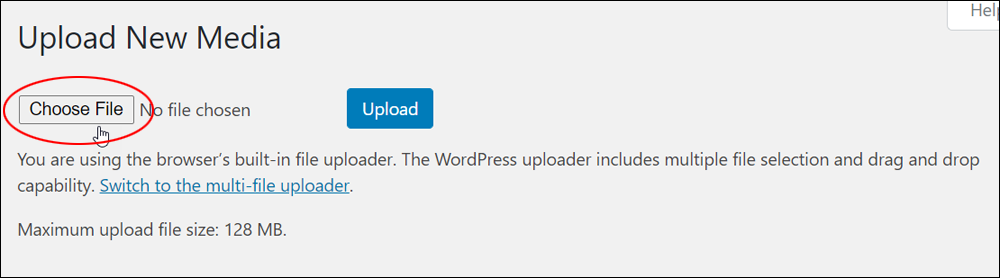
Clicking on the browser uploader link brings up a new screen like the one shown below.
Click the Choose File button, then locate the file you want to upload and click on the Upload button to import your media file.
To exit the browser uploader and return to the multi-file uploader, click on Switch to the multi-file uploader.
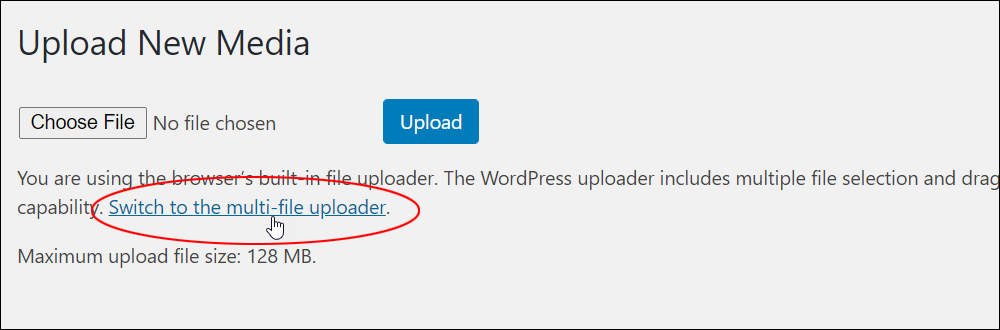
You can switch to either the Browser Uploader or the Multi-File uploader at any time by clicking on the links.
Attaching Media Files To Posts And Pages
As described earlier, there are two ways to upload media to WordPress:
- You can upload and add media into your content while creating or editing a Post or Page,
- You can upload media that is not attached to any existing Post or Page yet.
If a media file is uploaded within the edit screen of a post or page, it will automatically be attached to (i.e. associated with) the post or page you are working on.
If a media file is uploaded via the Media Library on its own, then the file(s) will be unattached.
These file(s) can be attached to a post or page when you select them from the Media Library and add them to your post or page later, but you can also attach any unattached media files directly from the Media Library.
Additionally, note the following:
- Media items are also “Posts” and can be displayed as such.
- If the parent post of an attached media item is deleted, the media item will become attached to the deleted post’s parent if it exists.
- If no parent post exists, the media item will become unattached and available for re-attachment to another post or page.
Because WordPress generates posts and pages dynamically (i.e. “on the fly”) when users type in the URL of your post or page into their browser or click on a link pointing to a page or post on your site, it needs media files to be “attached” in order to recognize that these are being used in a post or page.
Otherwise, the file just sits in the database of the media library and WordPress has no way to tell where it is being used (or if it is being used anywhere on your site).
In the screenshot below, you can see an image that has been uploaded to the Media Library and is currently unattached to any page or post on our site.
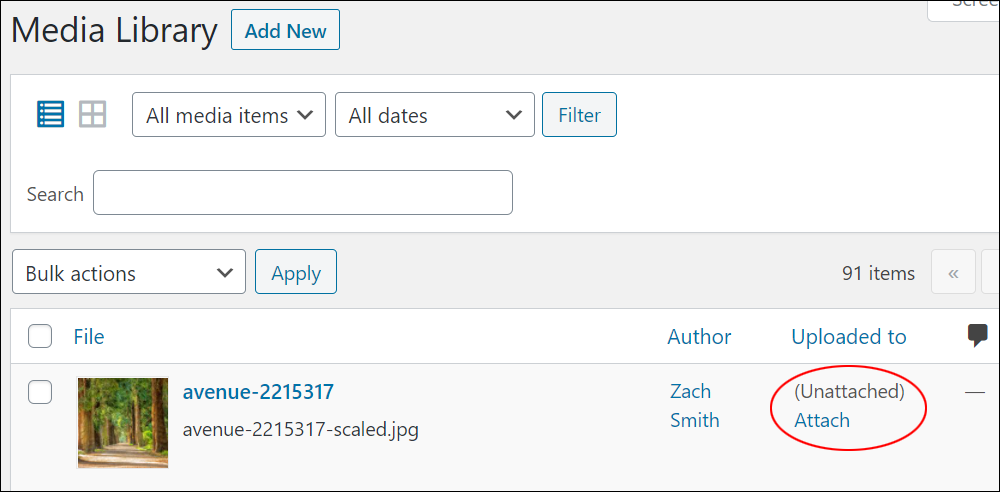
To associate this file with an existing page or post on your website, click on the Uploaded to > Attach link.

This brings up a screen that allows you to associate the file with an existing page or post.
Search for or select a page or post from the list displayed in the Attach to existing content window and click the Select button.
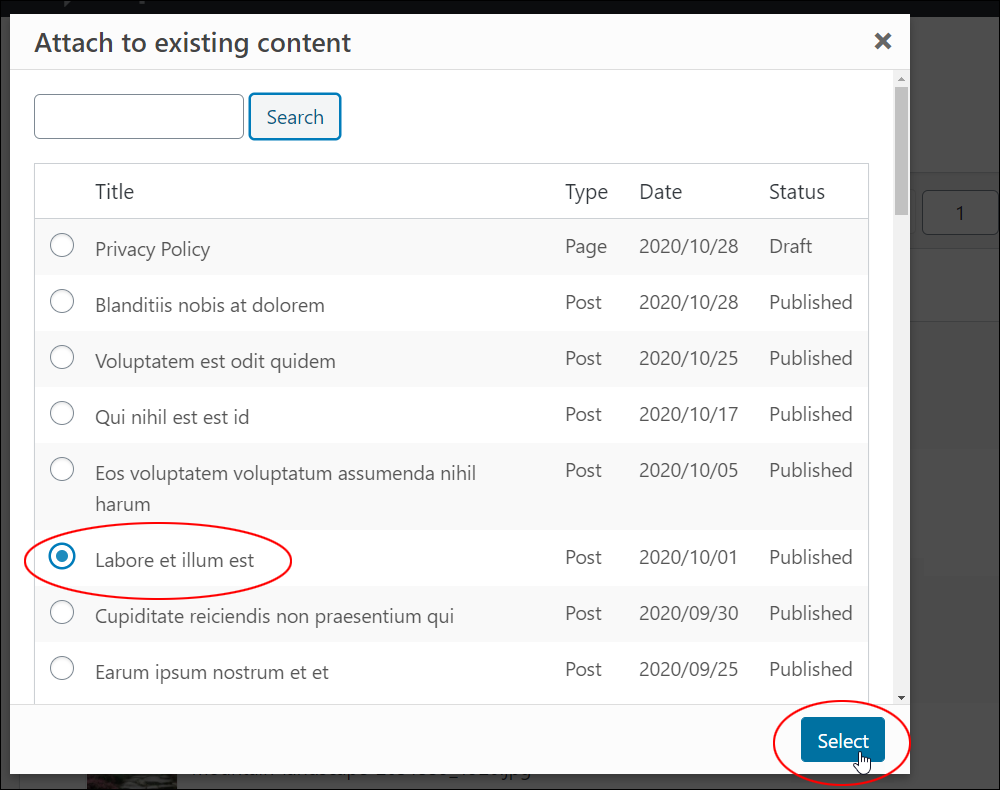
Your image will now be attached to the selected post or page.
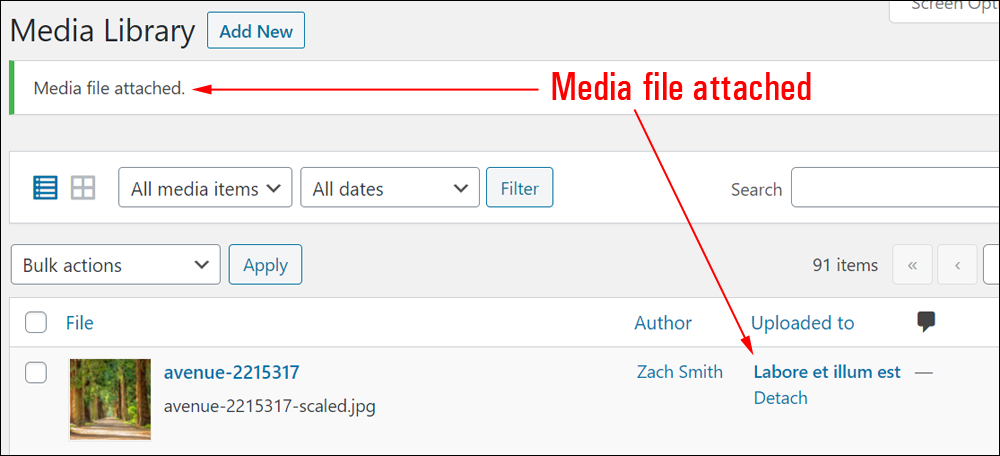
![]()
You can also use this method to detach media files from existing posts or pages and make them available again (i.e. “unattached) to be used elsewhere. To do this, simply go to the Media Library and click on the “Detach” link of an attached media file.
Note:
- Attaching an image to a page or a post means uploading it from your computer to your site via the Add Media tool of that page or post.
- Inserting the image into a page or a post means adding it to the content of that page or post.
These two functions are completely independent – you can upload an image to the Media Library without inserting it into a page or post and vice-versa.
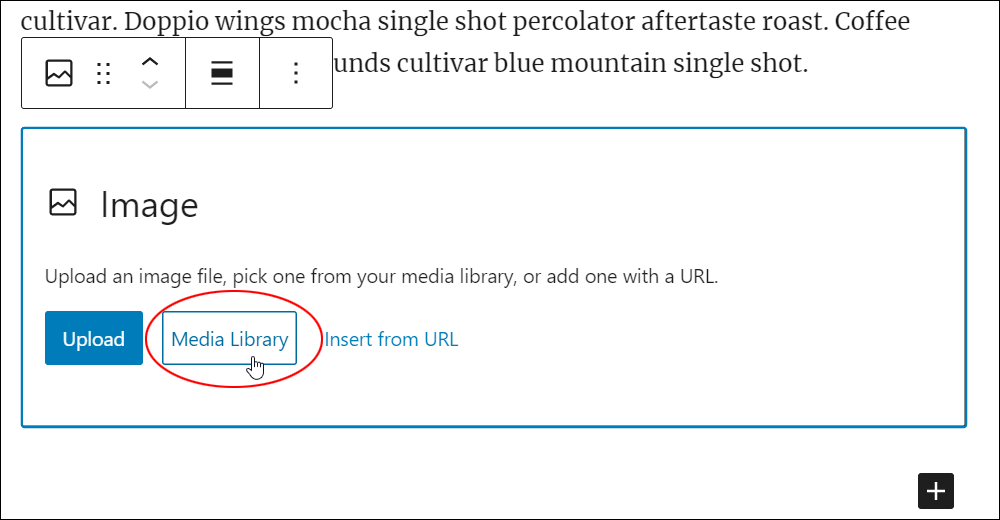
Inserting Media Into WordPress Posts And Pages
In version 5.0, WordPress introduced a new content editor called the WordPress Block Editor.
Adding media to posts and pages works differently depending on which editor you are working with.
To add media to posts and pages in WordPress using the WordPress Classic Editor, click on the Add Media button.
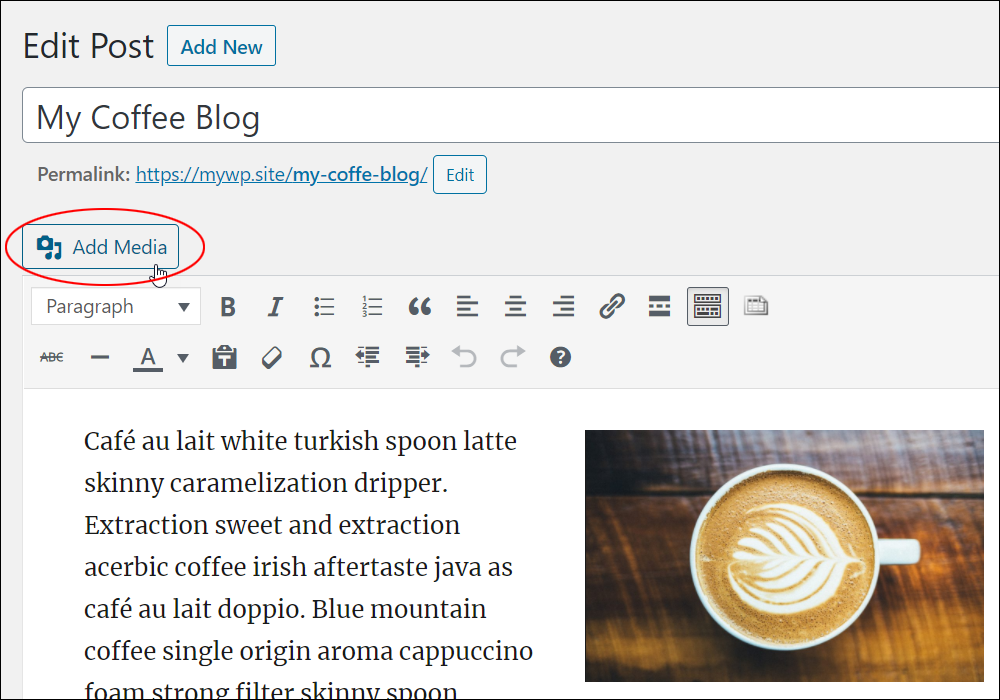
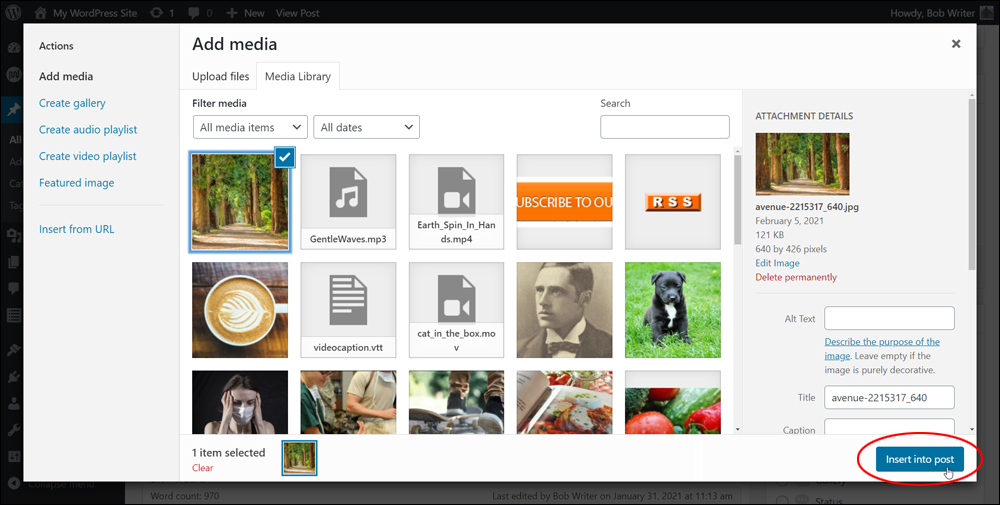
This will bring up the ‘Add media’ screen.
Here, you can upload media files or select media files that you have already uploaded to the Media Library. You can also create image galleries, audio playlists, video playlists, featured images, and add media from external URLs.

Select the media file you would like to insert into your post and click the ‘Insert into post’ button (or click the ‘Insert into page’ button if working on a page).
If you need help using the classic editor, see this tutorial: How To Use The WordPress Classic Editor
If you are using the WordPress block editor, you will insert media from the Media Library via the block that you have selected (e.g. an Image block, Gallery block, Video block, Audio block, etc.)
To learn how to use the new content editor with the Media Library, go here: How To Use The WordPress Block Editor
Editing Media Files In The WordPress Media Library
You can edit media items once you have uploaded these to the WordPress Media Library.
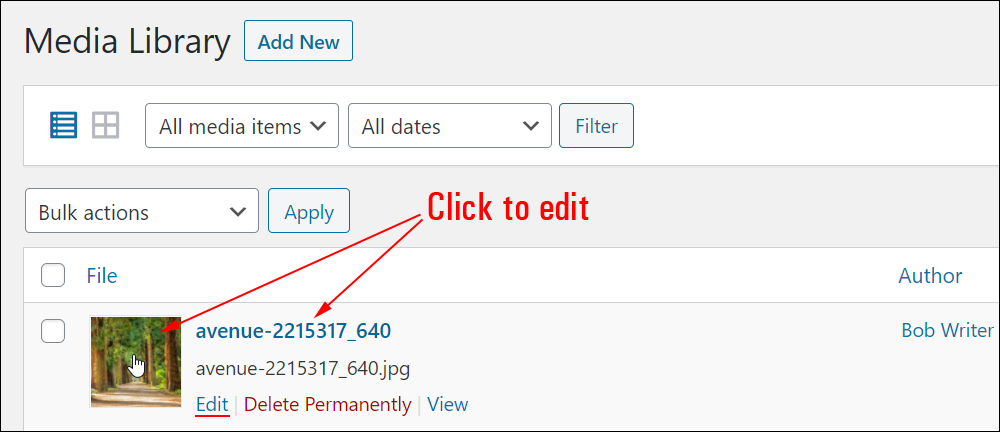
To edit an item in the Media Library, hover over the item and click on the ‘Edit’ link.
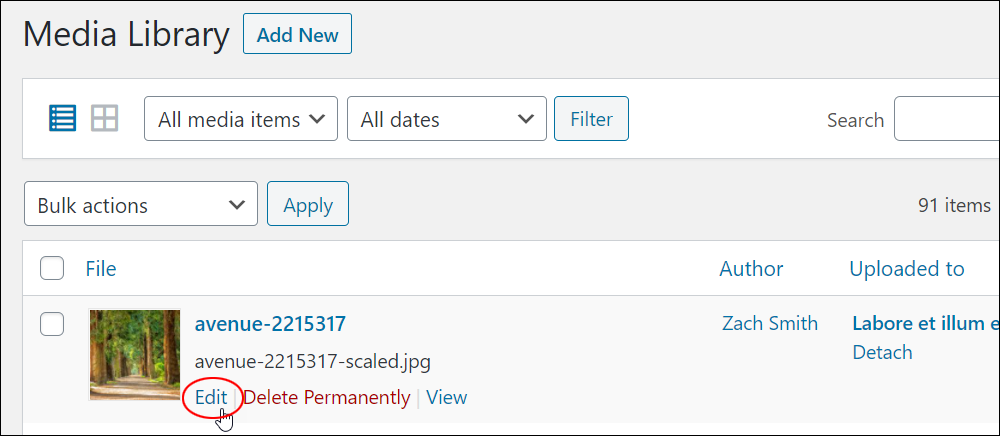
You can also edit the media item by clicking on its file name or thumbnail image.
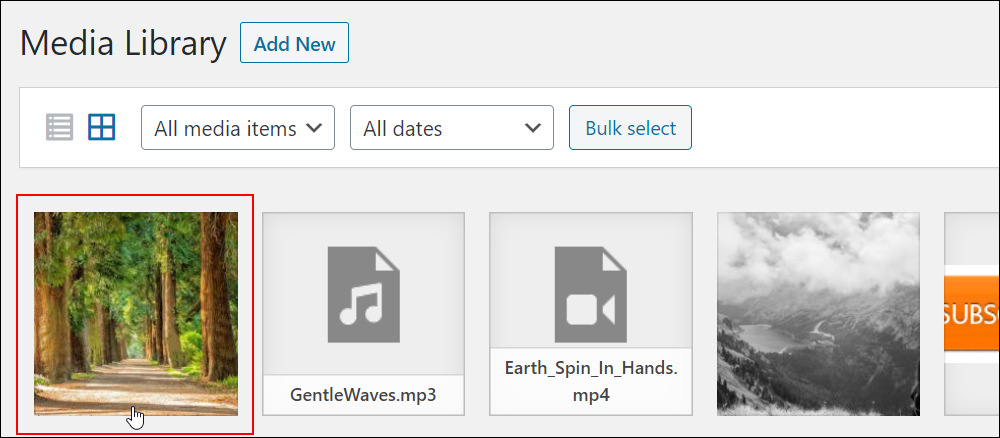
If you are viewing the Media Library using the grid view, click on the thumbnail image to edit the file.
![]()
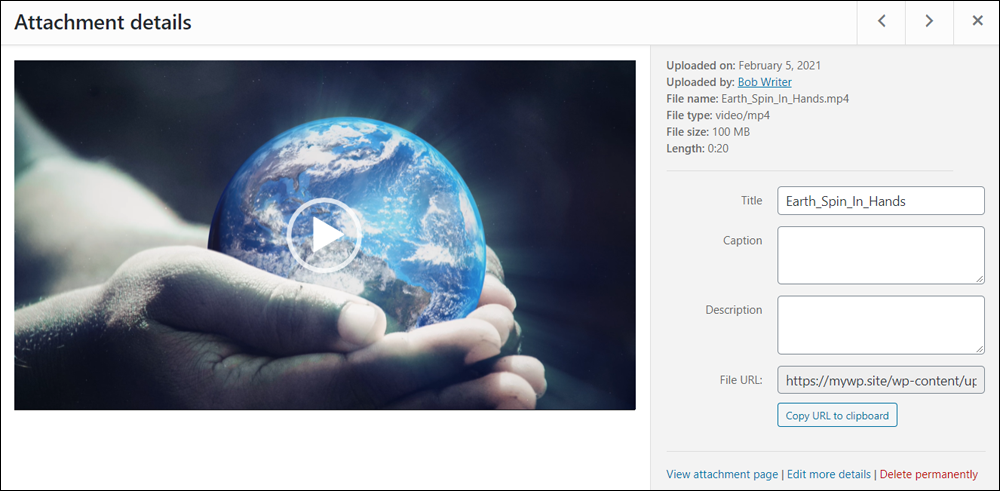
With uploaded media such as videos, audios, PDF documents, etc. clicking on the thumbnail in Grid view brings up the edit ‘Attachment details’ screen.
Here, you can edit the media file’s attachment page details, such as the File Title, Caption, and Description.
Clicking on the ‘Edit more details’ link brings up the media file’s Edit Media screen.
Here, you can view more details about your media file, edit fields like its caption and description, and set a featured image.
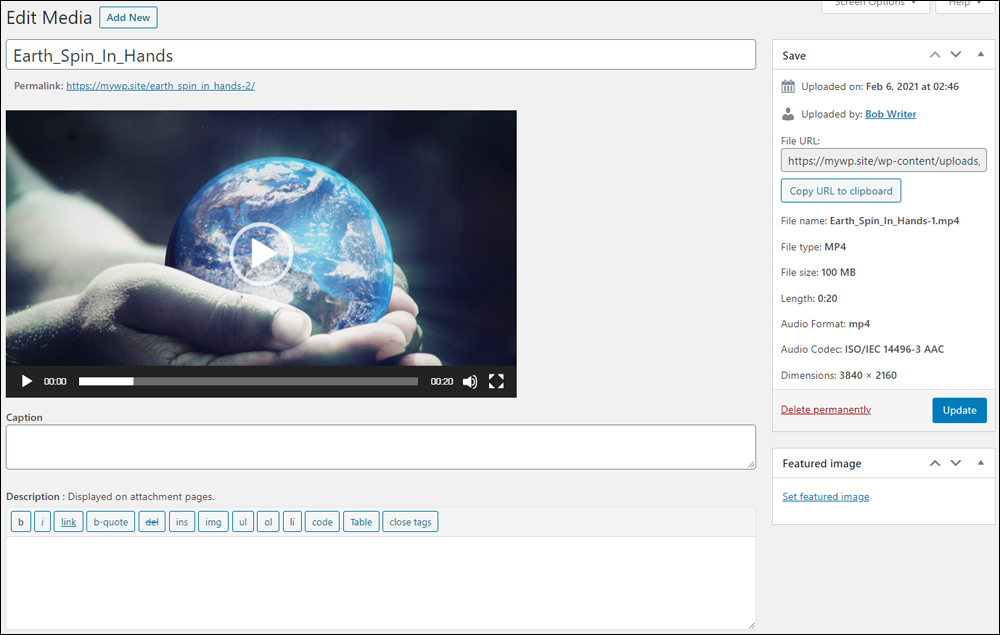
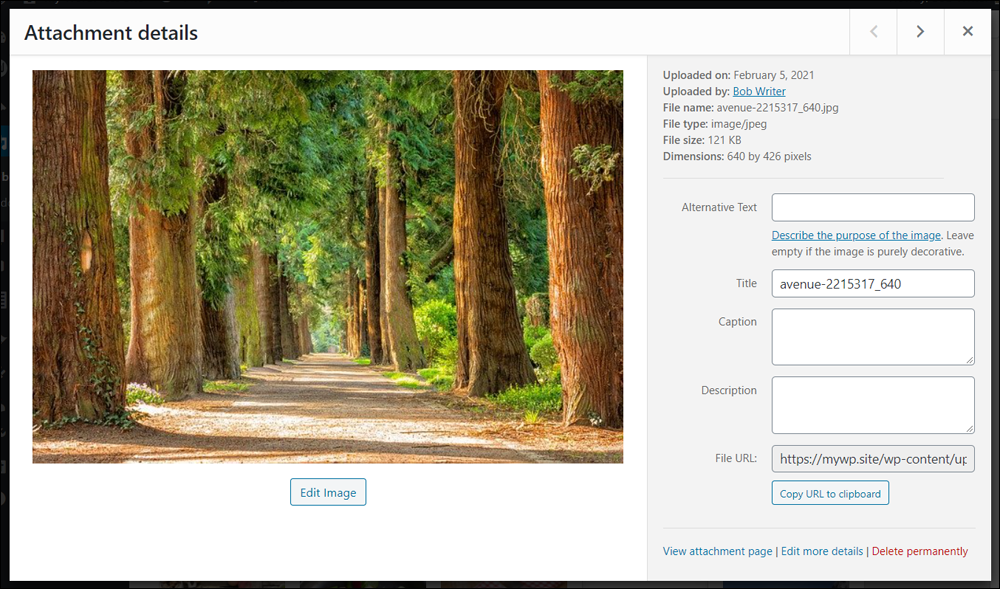
Image files offer additional editing options than other media file types, like editing its Alternative text (alt tag) field.
Clicking on the ‘Edit more details’ link brings up additional ways to edit your image, such as cropping, flipping, scaling, resizing, etc.
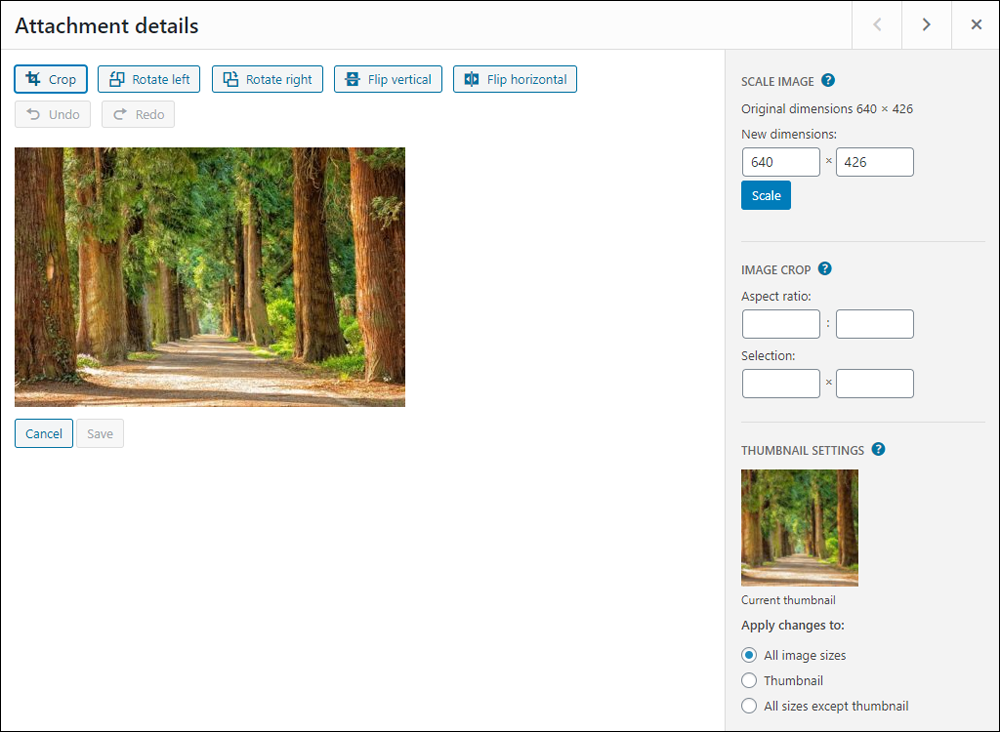
For a detailed tutorial on how to edit images in the WordPress Media Library, go here: How To Edit Images In The WordPress Media Library
Deleting Media Files From The WordPress Media Library
To delete an item from the Media Library, hover over the item and click on the ‘Delete Permanently’ link.
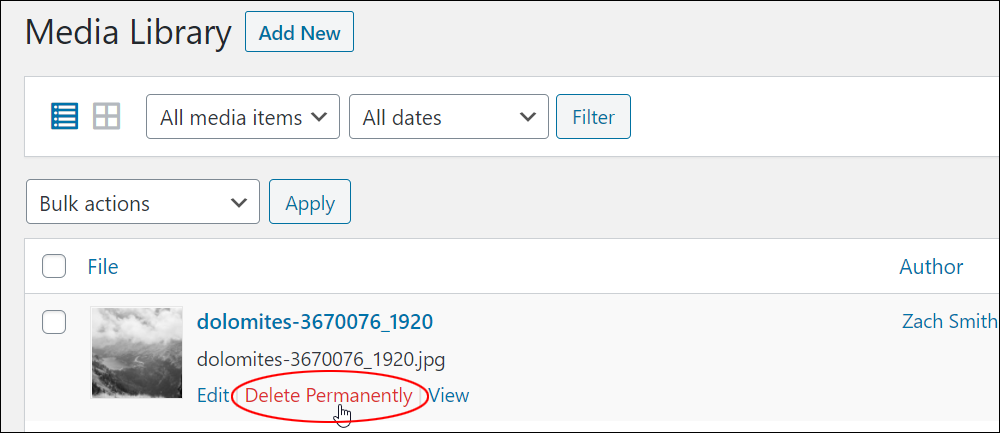
You will be asked to confirm if you want to delete the file. Keep in mind that once you delete a file from your site, you cannot undo this operation (you can, however, reupload the file to your site).
Click the ‘OK’ button to proceed or ‘Cancel’ to stop.
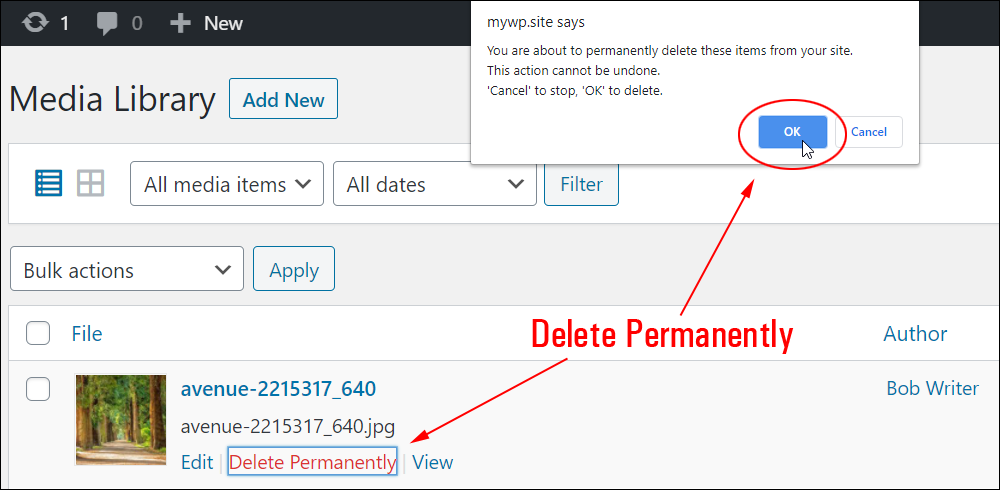
If you proceed, your media file will be permanently deleted.

See the Filtering Options section further below for details on how to delete multiple media files from the WordPress Media Library.
Viewing Items Uploaded To The WordPress Media Library
You can view items you have uploaded to the WordPress Media Library by hovering over the item and clicking on the ‘View’ link.
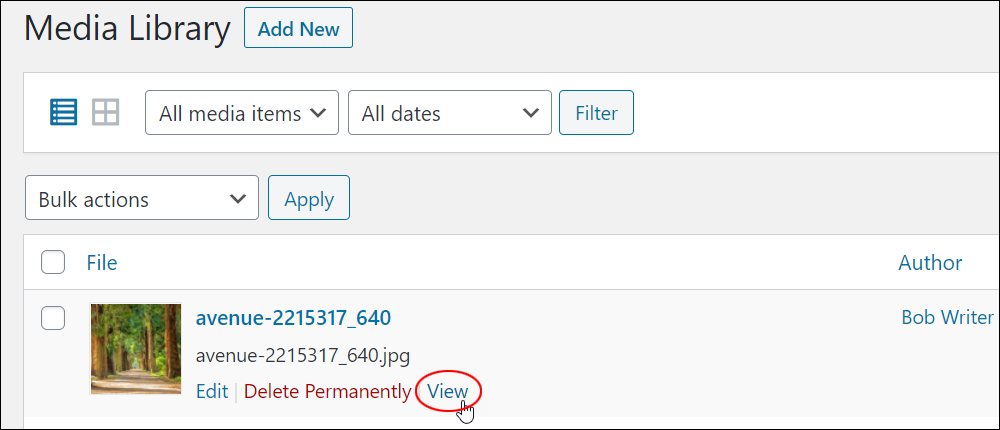
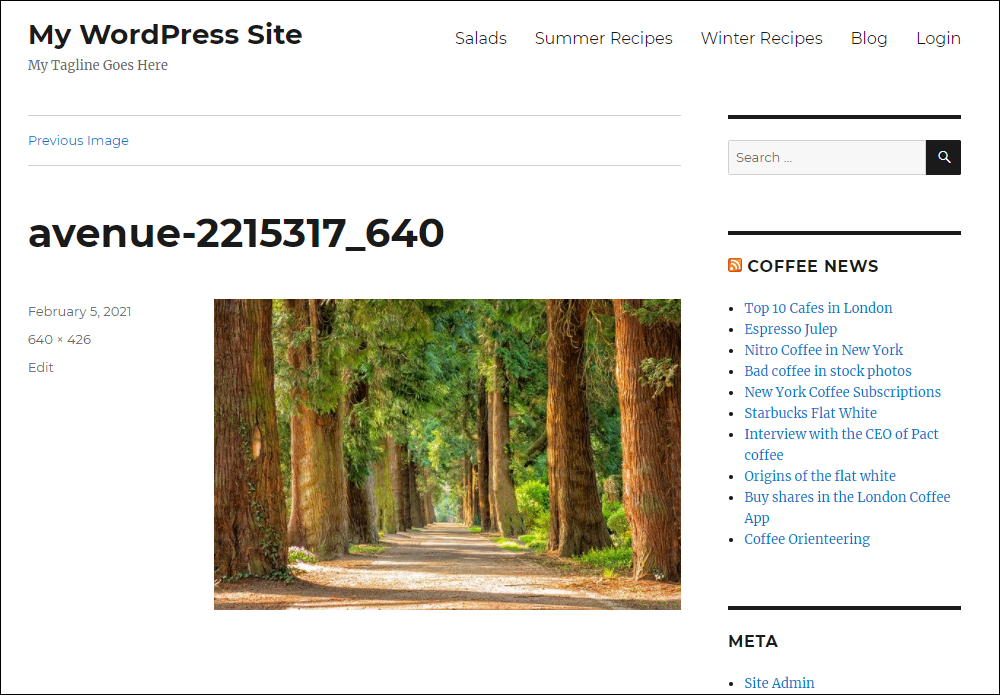
The file displays as a separate post or attachment page.
Additional Information – Media Library Table
Media Library items are displayed in a table, with all your media items listed by row (if viewing in List mode), and the newest uploaded item listed first.
The Media Library Table displays information about your media files in various columns. These include:
- [ ] – Check the box to select a media file item. Multiple selected items can be processed using the ‘Bulk actions’ dropdown menu.
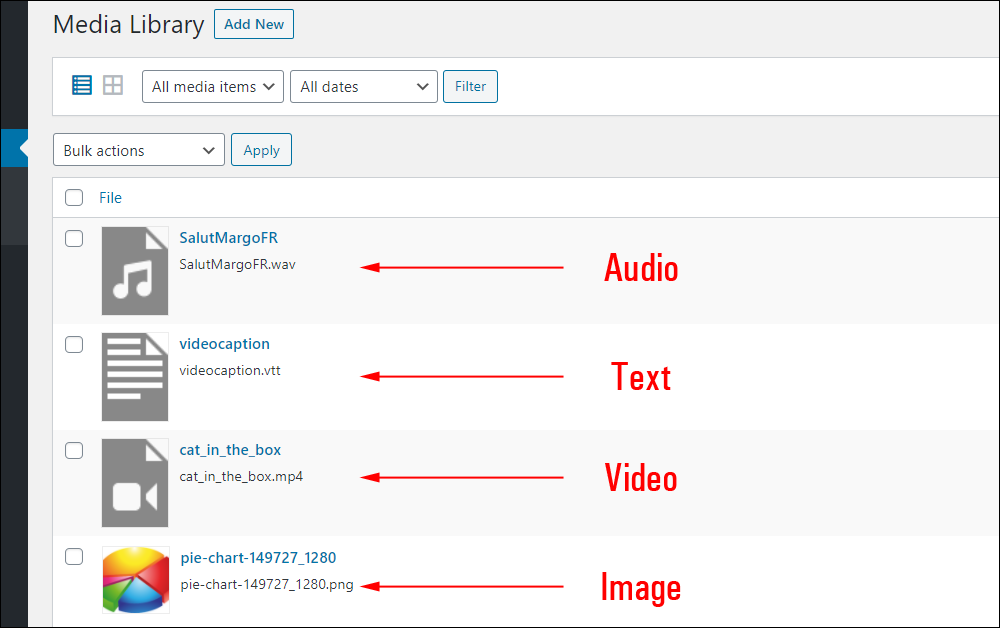
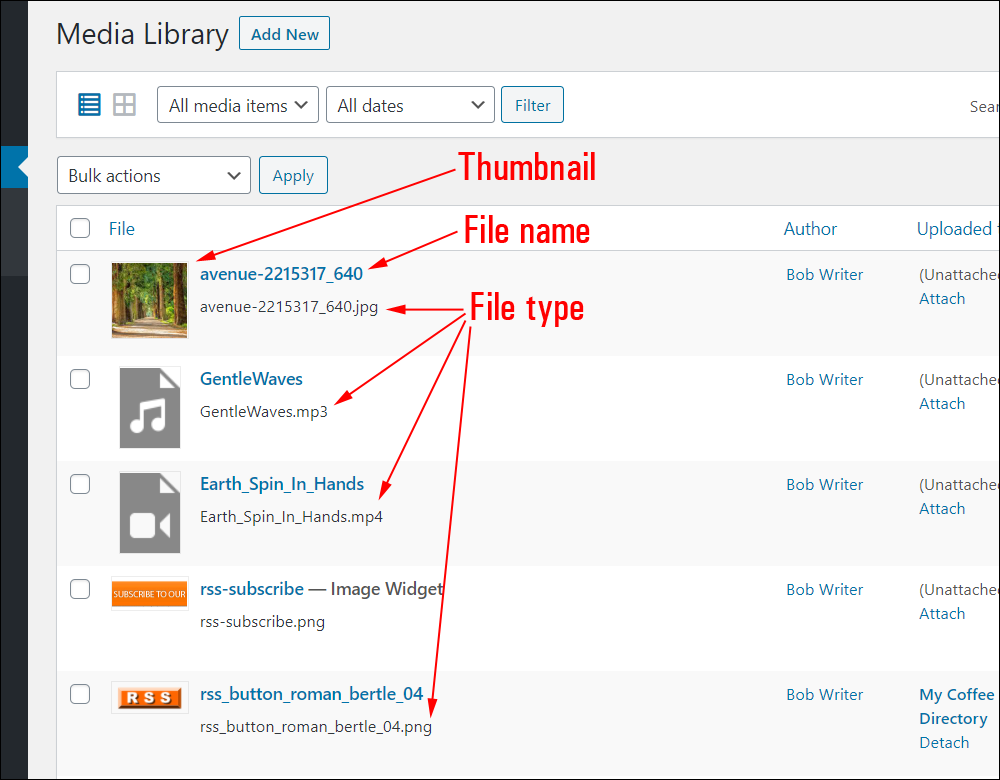
- File – Displays the media file thumbnail, media file title, the filename of the uploaded media, and the file type (after the filename).
- Author – Displays the name of the user who uploaded the media file or the file’s assigned author. Click on the Author link in this column to filter and display all media files uploaded by the user. Note: Files can be assigned a different author than the user who uploaded the file. For details on how to change authors for media files, see this tutorial: How To Edit Images In The WordPress Media Library
- Uploaded to – Displays the post or page the media file has been attached to (or if the file is unattached). If a file is attached to a Post or Page, click on the title of the Post or Page to open the edit screen. If a media file is unattached, an “Attach” link will appear allowing the media file to be attached to selected Posts or Pages.
- Comments – Notifies you of any comments that have been posted on the media attachment page by displaying a number in a comments bubble. For more details about using comments, see our tutorial on How To Manage Comments In WordPress
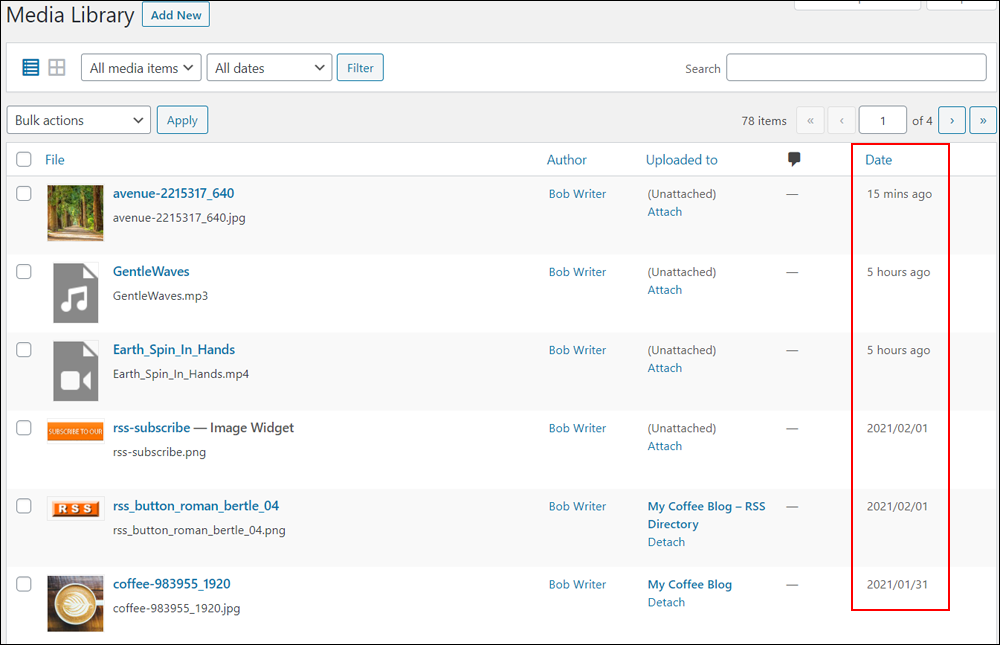
- Date – Displays the date or time the media file was uploaded to the Media Library.
The file’s media type (e.g TXT, PNG, JPG, PDF) is displayed below the file’s name (i.e. the title of your media file). Note: this is not the same as the filename, which is the name of the file uploaded to the Media Library.
If a media file has only been recently uploaded, the Date column will display how long ago the upload took place.
Sortable Columns
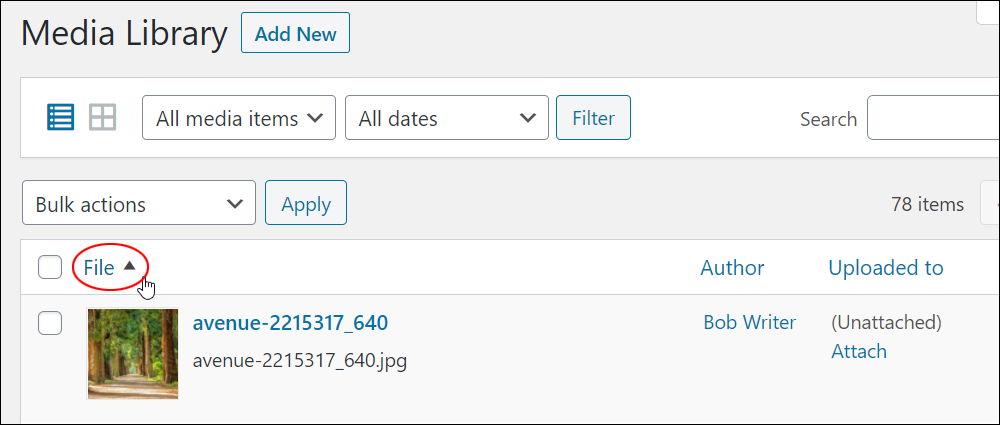
You can click on the column headings in the Media Library Table to sort media file entries in ascending or descending order.
Hover over a column title (e.g. File), and an up arrow or down arrow will display. Click the column heading title to change the sort order of your media files.
This applies to all columns (for example, click on the Author column to sort media files by author or click on the Date column to view newer or older entries first).
Media Library Table – Page Navigation
The Media Library Table displays how many items have been uploaded and the number of pages (if there is more than one page of uploaded media).
You can use the navigation arrows to skip to the first or last page or to move backward or forward one page at a time. You can also enter a page number in the current page number box to go directly to that page.
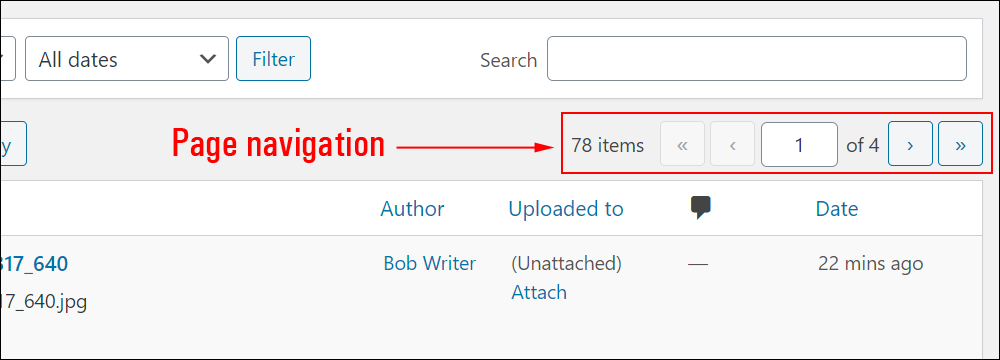
You can also specify the number of media items to display per page (see next section below).
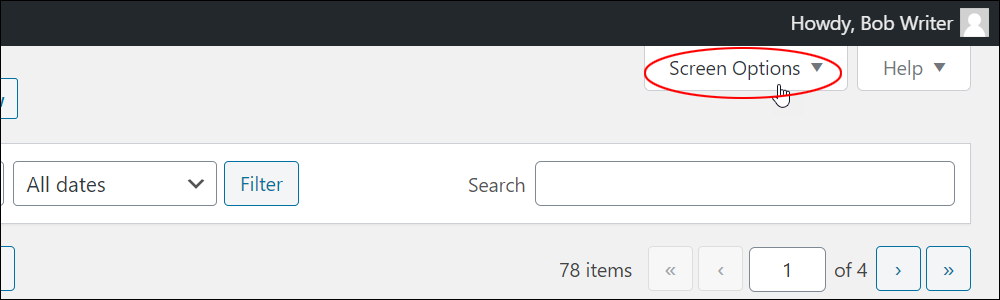
Media Library Screen Options
The Screen Options tab lets you select which columns to display (or hide from view) in the Media Library Table.
Click on the Screen Options tab in the top right-hand corner of your Media Library screen.
A list of columns displays with a check-box next to each column. Check the box to display a column in the Media Library Table or leave the box unchecked to hide the column.
You can also specify the number of media items to display per page in the Media Library Table (default = 20 items per page). Remember to click the ‘Apply’ button when finished to apply your new settings.
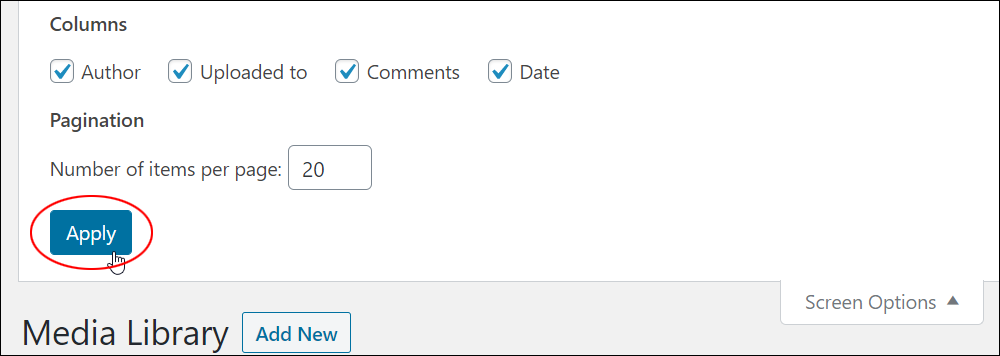
Click the ‘Screen Options’ tab again to close the Screen Options settings area.
Search Media
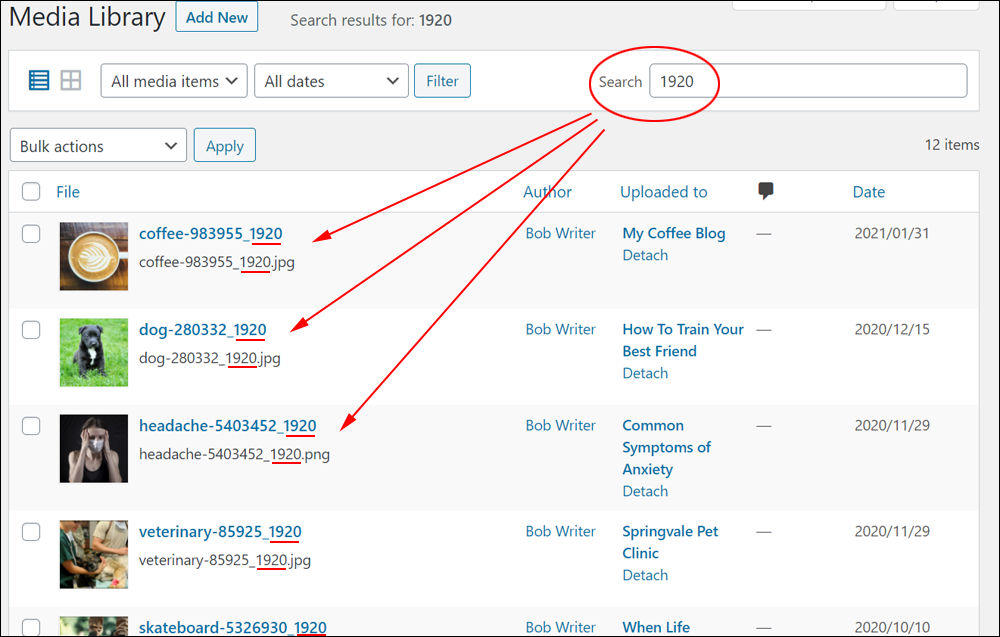
Above and to the right of the Media Library Table is a search box. This feature is especially useful if you have uploaded loads of media files to the Media Library.
Enter one or more search terms (separate multiple terms using commas) and hit Enter.
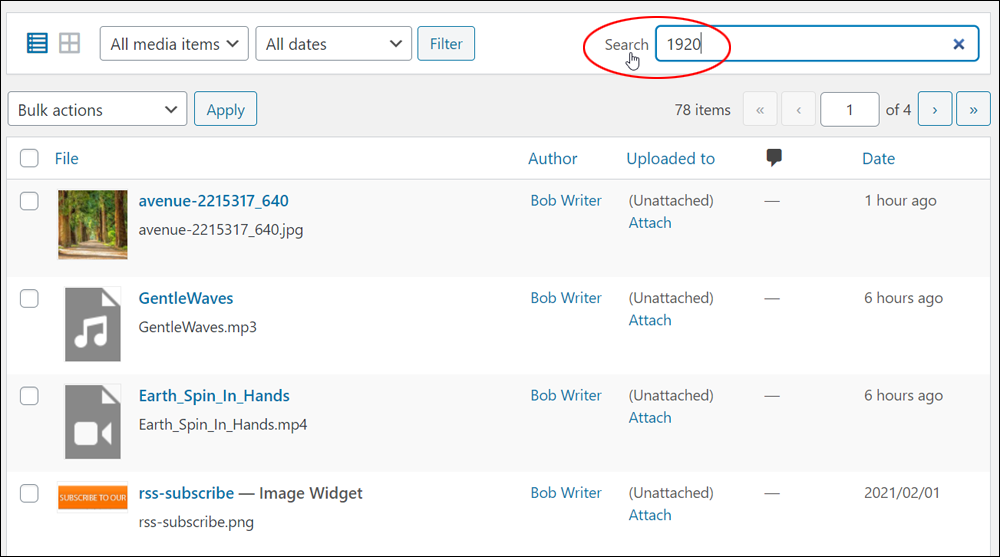
This will display all the media files that include your search term(s).
To reset your page and display all the media files in your Media Library Table, click the Filter button and make sure the filter dropdown menus are set to their default (‘All media items’ and ‘All dates).

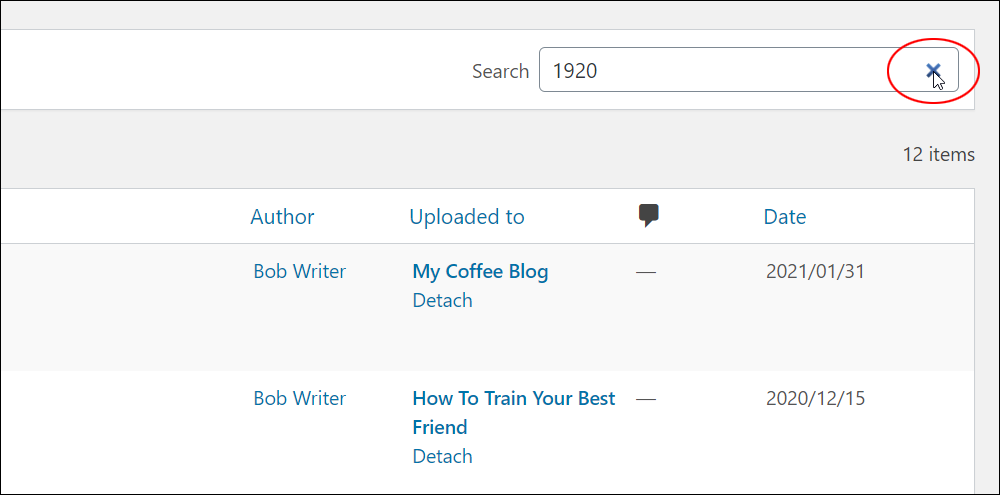
Alternatively, just click the X in the search box to clear your search results and return the full list of media items in your Media Library.
Filtering Options
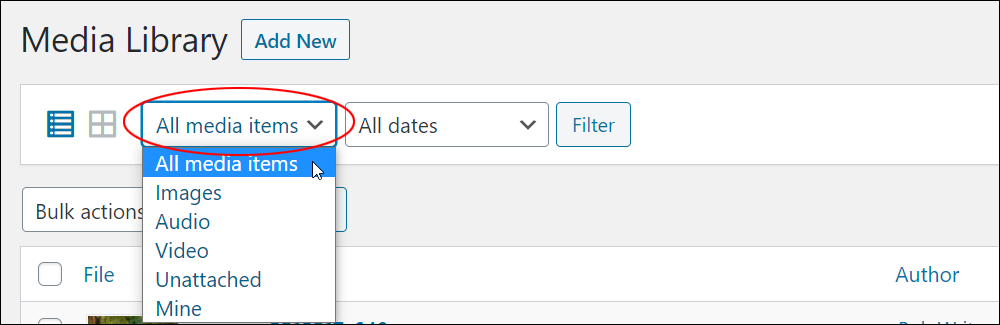
Use the Media Library Table filter dropdown menus to display a list containing only selected media files of a certain file type, or media files that were uploaded within a certain period range.
The File Type dropdown menu lists all your uploaded media file types, eg:
- All media items
- Images
- Audio
- Video
- Unattached
- Mine (there are the media files you have uploaded)
As you upload new file types, these will be added to the dropdown menu and become available for selection.
Consequently, removing all files of a certain type will remove that category from the dropdown menu.
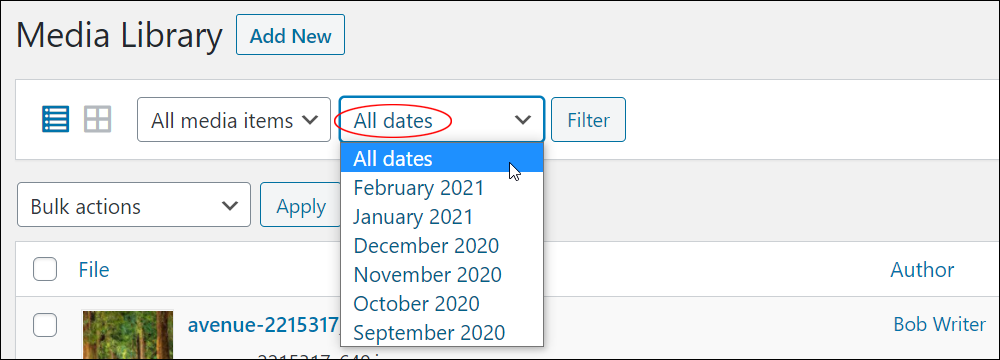
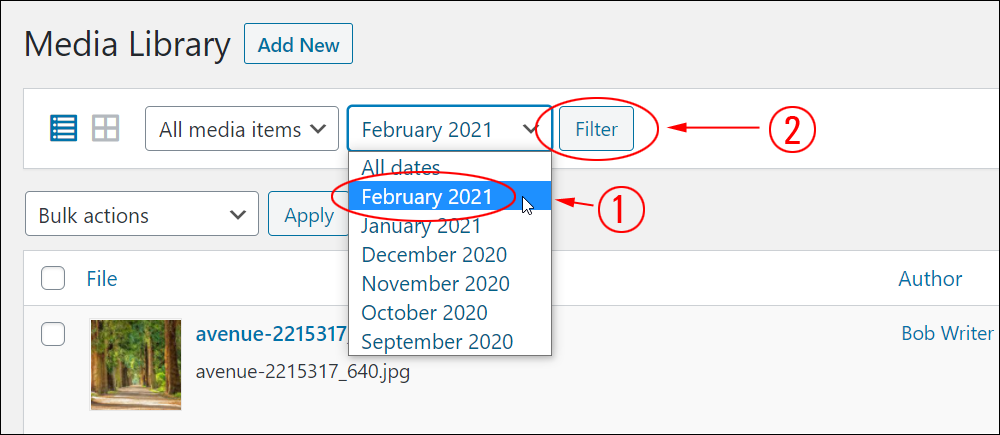
Additionally, use the Filter by Date dropdown menu to display only media files that were uploaded to the Media Library during a specific period of time.
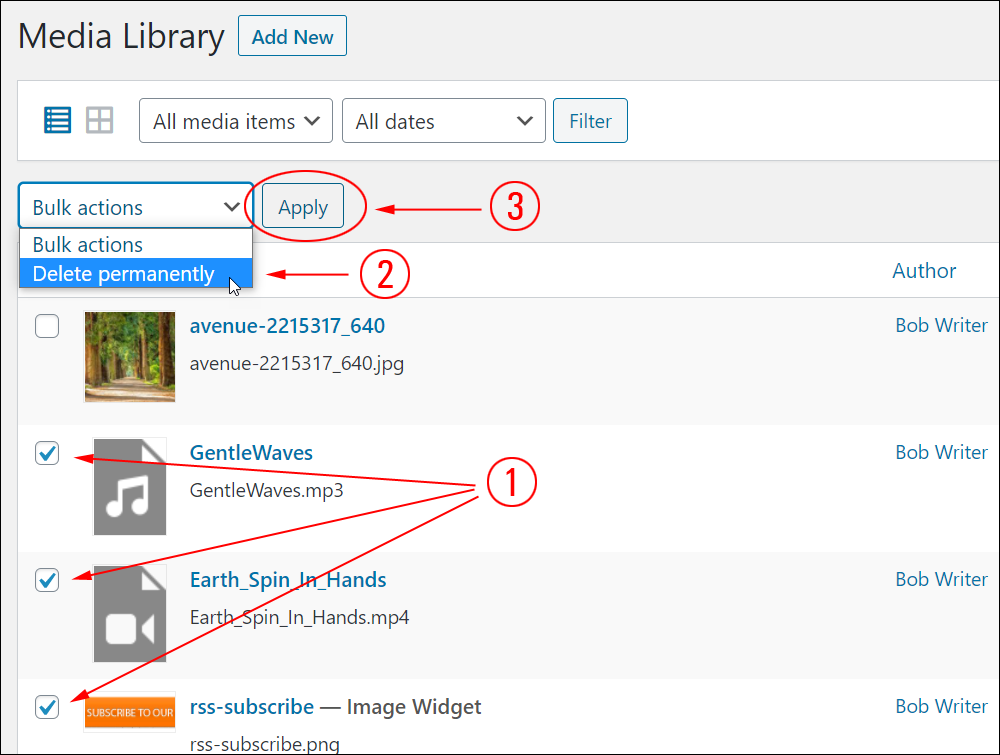
The Bulk Actions dropdown menu lets you delete multiple selected media file entries from your Media Library.
To use the Bulk Actions filter, (1) select the checkbox(es) for all media files you want to delete, then (2) select Delete Permanently from the Bulk Actions drop-down menu, and (3) click the Apply button.
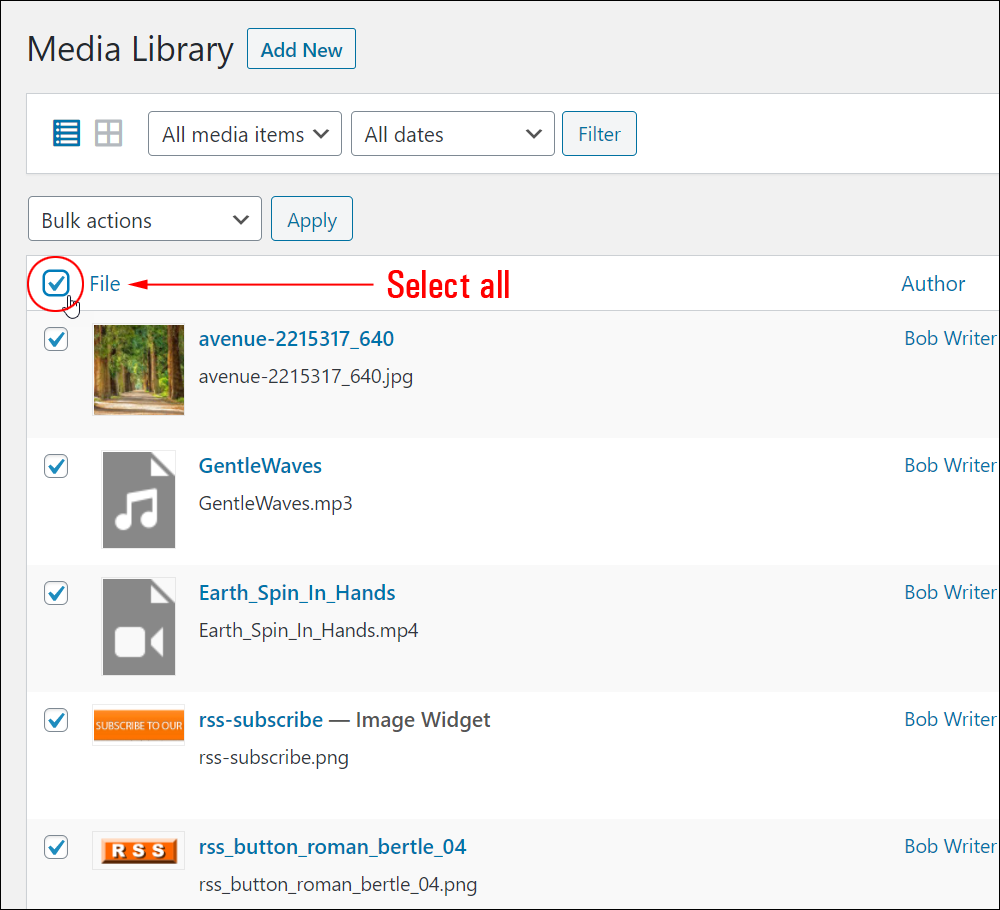
You can select media files by ticking the box next to each entry individually or click on the column header checkbox to select all media files (alternatively, uncheck this box in the header or footer title bar to deselect all entries in the Media Library Table).
These two filtering dropdown menus allow you to narrow your list of media files considerably.
For example, to display all media files uploaded during a certain period, leave the ‘Filter by File Type’ menu set to its default option (‘All media items’), then (1) select one of the date ranges from the ‘Filter by Date’ dropdown menu, and (2) click on the Filter button to apply your filter selection.
WordPress Media Plugins
There are several plugins you can add to your WordPress site to enhance your Media Library functionality and help you better manage and organize your uploaded media.
For example:
Media Library Assistant
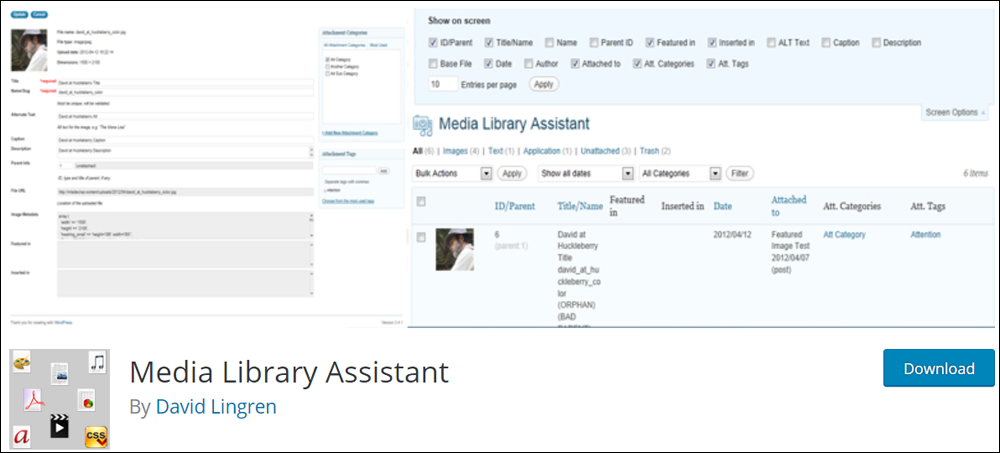
The Media Library Assistant plugin provides several enhancements to help you manage the WordPress Media Library, including shortcodes, templates, and integrations with other plugins and media formats.
For more information about this plugin, go here: Media Library Assistant
Media Library Folders
Media Library Folders enhances the functionality of the WordPress Media Library by allowing you to add and build new folders and subfolders to label and organize your media folders and perform operations on these folders and their contents.
It also provides an effective way to manage image and video folders when creating WordPress image galleries and albums.
For more information about this plugin, go here: Media Library Folders
WordPress Media Library – FAQs
Here are frequently asked questions about the WordPress media library:
What is the WordPress media library?
The WordPress media library is a built-in feature that allows users to manage and store media files such as images, videos, and audio. It provides a centralized location within the WordPress dashboard for easy access to media assets used in posts, pages, and other content types.
How do I access the WordPress media library?
You can access the media library by navigating to the “Media” section in the WordPress dashboard. From there, you can view, upload, edit, and delete media files.
What are the benefits of using the WordPress media library?
The media library offers several benefits, including:
- Centralized storage: All media files are stored in one location, making it easy to organize and manage.
- Integration with content: Media files can be easily inserted into posts, pages, and other content types using the WordPress editor.
- Media management: Users can edit, categorize, and search for media files within the library, enhancing workflow efficiency.
What types of media files can I upload to the WordPress media library?
You can upload various types of media files, including images (JPEG, PNG, GIF), videos (MP4, MOV), audio (MP3, WAV), and documents (PDF, DOCX).
Are there any challenges with using the WordPress media library?
One challenge users may encounter is managing large numbers of media files, which can lead to clutter and difficulty finding specific items. Additionally, storage limitations may arise, especially on shared hosting plans with restricted disk space.
How can I optimize the WordPress media library for performance?
To optimize the media library, consider using image optimization plugins to reduce file sizes without sacrificing quality. Additionally, regularly review and delete unused or redundant media files to free up storage space.
***
Congratulations! Now you know how to use the WordPress Media Library.
See these additional tutorials for help using the WordPress Media Library:
- Using Images In WordPress
- How To Add And Format Images In WordPress
- How To Edit WordPress Media Library Images
- How To Add An Image Gallery In WordPress
- How To Use Featured Images In WordPress
***

Updated: July 5th, 2024